
How To Jtag Your IBOX 2 Plus & 3
This guide was complied from information found on Various forums which ive put together in what i hope is a easy to understand format and then tested on my own bricked Ibox 3.
.
This will recover your box from the Blue Light condition after flashing a bootloader or image after the 17/05/2014.
A big thanks to Bazal from the ibox forum for his files, guide and help.
Thanks to psgamer for the BB3 XML files and bootloaders.
Thanks to is0-mick for original VU+.pdf
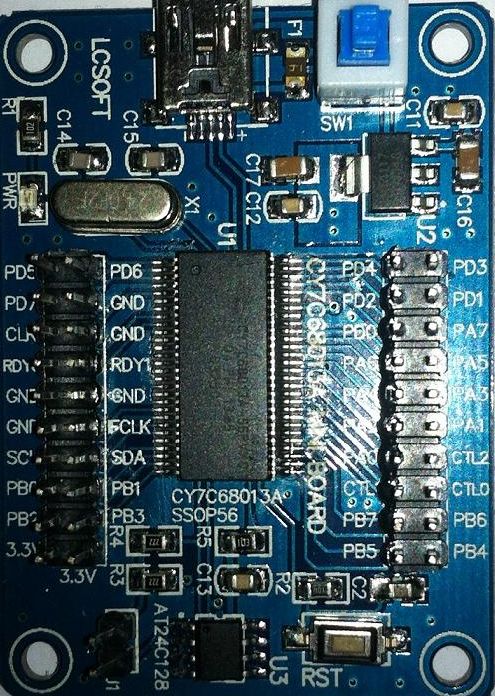
The interface we need to complete the Jtag process is a Cypress EZ-USB FX2LP CY7C68013A USB2.0 Development Board, there appears to be 2 on the market which both seem to share the same model number.
The one we nee for BB3 Compatibility is the single jumper version, the dual jumper version will not work with BB3.
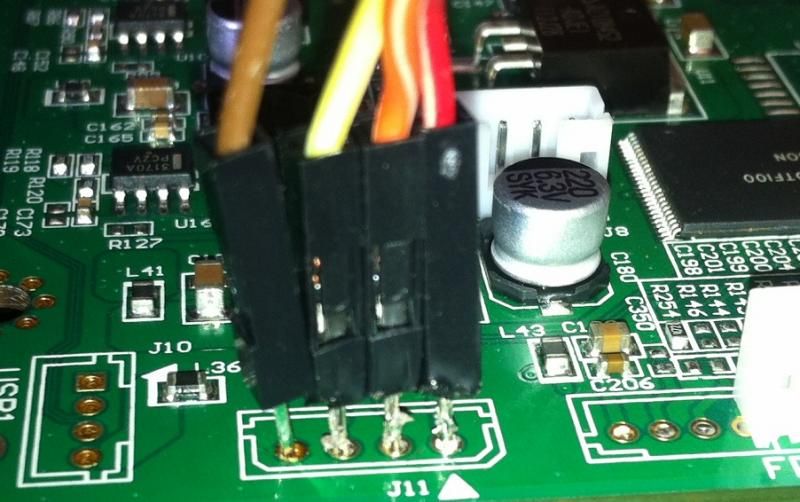
First thing we need to do is strip out the mobo from the ibox to solder to the jtag points.
I used 2.54mm 1pin 1p-1p Female to Male jumper wire this has a hard pin at one end to solder to the jtag points and the correct socket at the other end to connect to the cypress
board.
The method i used to solder these in place was simple to hold and heat with the solder iron the pin from the 2.54mm 1pin 1p-1p Female to Male jumper wire, doing this then heat's the
solder on the board and the pin simply slips in as the solder goes molten.
Try as i did i could not get this to work at all on Windows 7 so i used a old Windows XP PC which worked fine.
1: Install Broadcom Studio 3 (See Attached Files)
2: Install Bcm97358.msi
3: Install NETFRAMEWORK 3.5 THEN NET FRAMEWORK 4
4: Remove the single jumper from the Cypress board and plug the Cypress board in to a USB port.
5: Your PC should now start to install the Broadcom Test Adapter.
At this point choose the option install automatically, the driver will then install upon completion you'll need to reboot your PC.
After the reboot the above wizard appears again only it says.
This wizard helps you install software for: Broadcom Test Adapter.
Follow the wizard again using install automatically and after the wizard is done you are ready installing.
Drivers for the Cypress board (Broadcom studio 3 wil now know the cypress board).
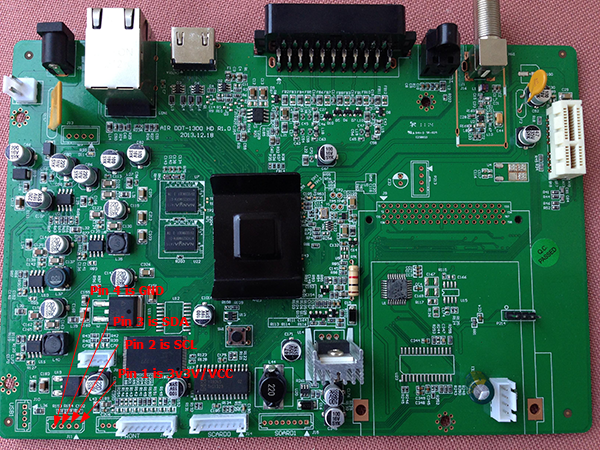
6. Now we need to make a cable between the cypress board and the CLOUD IBOX 3. The pinouts below are from the Cloud Ibox to the Cypress board.
Pin 1 is 3v3V (Red Wire)
Pin 2 is SCL
Pin 3 is SDA
Pin 4 is GND
7: Connect the cable between the cypress board and the CLOUD IBOX 3
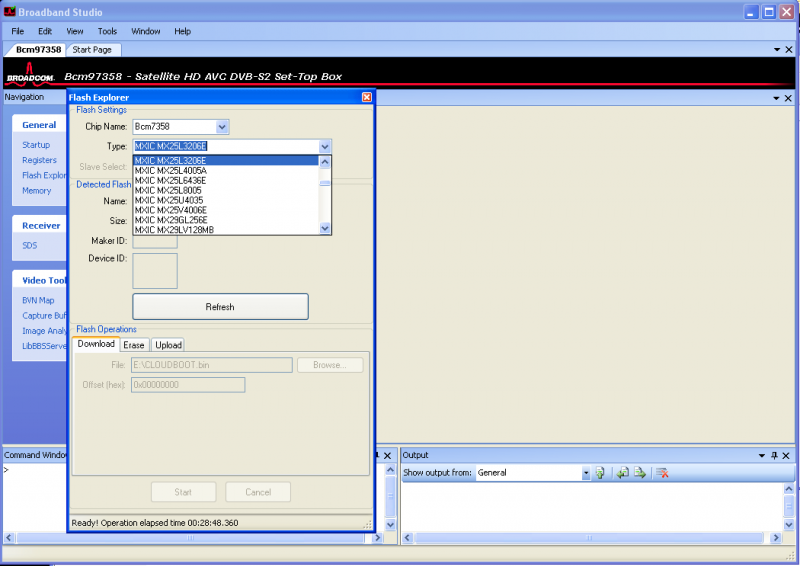
8: Start Broadcom studio 3
9: In the menu select :View => devices => BCM7358
10: turn on the CLOUD IBOX 3 YOU SHOULD SEE CONECTED
11: COPY The 2 flash files TO PROGRAMS/BROADCOM/BROADBAND STUDIO 3/FLASHES.
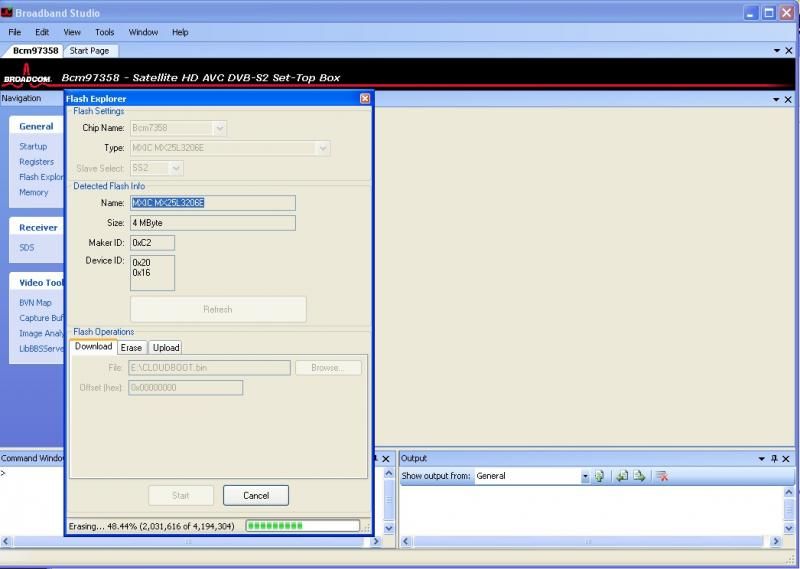
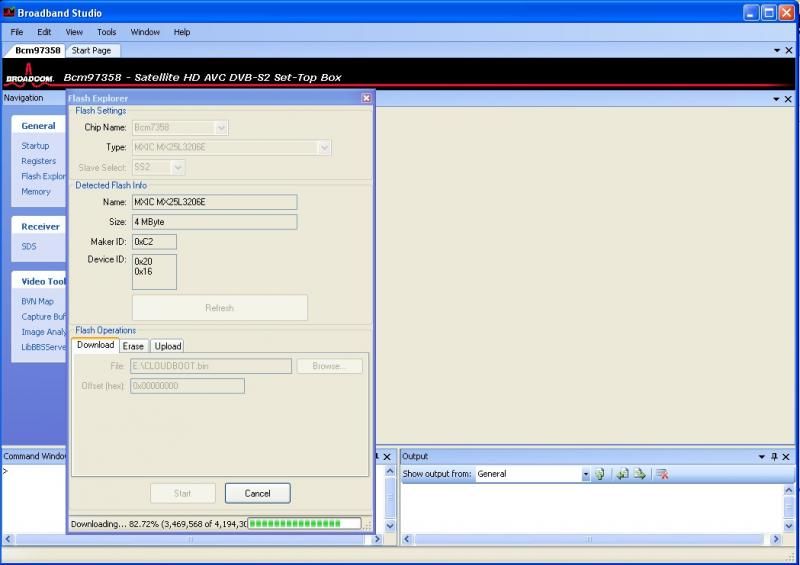
12: Now in the left hand window of BBS Select Flash Explorer
13: Select “MXIC MX25L3206E” in the type field
14: Select “Refresh” IF CORRECT CHIP IT SHOULD SHOW DETAIL
15: Select “Browse” and select the file CLOUDBOOT.BIN
16: Select “Start” You should now see that the flash is being programmed to the CLOUD IBOX 2 plus or 3.This can take upto 30 mins but you see the progress on screen.
17: After the programming is finished turn off the cloud ibox disconnect the cable to the Cypress board.
18: Now power up the Ibox it should say boot, when it does turn it off.
19 Now on a Fat 32 formatted usb stick transfer the xspeed folder of the image of your choice to the stick.
20: Turn on cloud ibox then let it install image when finished it will say done
reboot box & fingers crossed you will get a working cloud ibox 3

Results 1 to 7 of 7
Thread: unbrick cloud ibox 3 and 2+
-
18th November, 2014, 12:36 PM #1Junior Member


- Join Date
- Jul 2014
- Posts
- 22
- Thanks

- 0
- Thanks

- 13
- Thanked in
- 7 Posts
 unbrick cloud ibox 3 and 2+
-
-
19th December, 2014, 02:31 PM #2Top Poster
- Join Date
- Apr 2010
- Posts
- 165
- Thanks
- 3
- Thanks
- 2
- Thanked in
- 2 Posts
hi mate any chance you can show me a pic off the card and where to put the wires please am a bit confused
-
20th December, 2014, 09:11 PM #3Top Poster
- Join Date
- Apr 2010
- Posts
- 165
- Thanks
- 3
- Thanks
- 2
- Thanked in
- 2 Posts
where do i see the cloudboot.bin ?
-
12th January, 2015, 11:48 PM #4Junior Member
- Join Date
- Jul 2014
- Posts
- 22
- Thanks
- 0
- Thanks
- 13
- Thanked in
- 7 Posts

-
14th January, 2015, 04:35 PM #5Top Poster
- Join Date
- Apr 2010
- Posts
- 165
- Thanks
- 3
- Thanks
- 2
- Thanked in
- 2 Posts
cheers mate for the upload i managed to sort
-
14th January, 2015, 08:09 PM #6Junior Member
- Join Date
- Jul 2014
- Posts
- 22
- Thanks
- 0
- Thanks
- 13
- Thanked in
- 7 Posts
no probs mate
-
23rd February, 2015, 04:04 AM #7Newbie
- Join Date
- Feb 2015
- Posts
- 1
- Thanks
- 0
- Thanks
- 0
- Thanked in
- 0 Posts
thanks worked 4 me how have box running again

the bin file MX25L3206E v2 worked for me

 Reply With Quote
 Posting Permissions
All times are GMT +1. The time now is 06:10 AM.
 Cookie law compliance provided by
Cookie Control v1.0.0 Patch Level 1 (Lite) -
vBulletin Mods & Addons Copyright © 2024 DragonByte Technologies Ltd.
Cookie law compliance provided by
Cookie Control v1.0.0 Patch Level 1 (Lite) -
vBulletin Mods & Addons Copyright © 2024 DragonByte Technologies Ltd.
vBulletin Optimisation provided by vB Optimise (Pro) - vBulletin Mods & Addons Copyright © 2024 DragonByte Technologies Ltd.
Digital Kaos does not condone any illegal operations, including obtaining premium tv for free. Digital Kaos does not accept responsibilty for the loss of any equipment used.
Everything discussed on this forum is for experimental and educational purposes only. Use the information at your own risk.
vBulletin Skin By: PurevB.com
Powered by vBulletin® Version 4.2.5
Copyright ©2000 - 2024, Jelsoft Enterprises Ltd.
Copyright ©2000 - 2024, Jelsoft Enterprises Ltd.
vBulletin Optimisation provided by vB Optimise (Pro) - vBulletin Mods & Addons Copyright © 2024 DragonByte Technologies Ltd.
Digital Kaos does not condone any illegal operations, including obtaining premium tv for free. Digital Kaos does not accept responsibilty for the loss of any equipment used.
Everything discussed on this forum is for experimental and educational purposes only. Use the information at your own risk.
Bookmarks